Funny Homework Is Slideshow Conditioner Before Shampoo
Make Your Own Shampoo and Test How It Performs!
Abstract
Do you like your hair shiny and beautiful? The key to keeping your hair nice and clean is to use a good shampoo. But with so many different products in the store, how do you know which one works best for you? In this science project, you will put a variety of shampoos to the test, including your own self-made organic shampoo recipes. Do you think these will perform better than a store-bought product?
Summary
Short (2-5 days)
None
Readily available
Low ($20 - $50)
This project uses acetone for one test. Acetone is a flammable liquid. Keep away from open flames, sparks, or heat. Acetone is irritating to skin and eyes. Be sure to wear safety goggles and gloves. Work in an area with adequate ventilation. Adult supervision is recommended.
Svenja Lohner, PhD, Science Buddies
Objective
Make your own shampoos and do some quantitative testing to compare their performance to a store-bought product.
Introduction
Do you care about your hair and how it looks? Most likely, yes. After all, your hair is visible to everyone and you don't want it to appear all greasy and messy! As it frames your face, the hair is probably one part of the body that many people care most about. Just think of all the hair care products that you can buy: shampoo, conditioner, spray, mousse, or wax, just to name a few. Shampoo is by far the most common product used for hair treatment across all hair colors and lengths. Some people use "organic" shampoos, or even make their own recipes, because they do not like the synthetic chemical products in the shampoos in the store. Although there exist many different shampoo recipes and products in the stores as shown in Figure 1, they all have the same purpose: to clean your hair and scalp from dirt or grease. Your hair tends to get greasy because it accumulates an oily substance, also called sebum, that is made by your body to moisturize your scalp and protect your hair from drying out. If you have too much of it in your hair, it looks oily. How can shampoos remove all this build-up of grease?
To find out, we will take a closer look at the shampoo ingredients, or its recipe, also called formulation. Besides water, surfactants are the main ingredients in shampoos. They have names such as sodium lauryl sulfate, sodium laureth sulfate or cocamidopropyl betaine. Surfactants are unique chemicals as their chemical structure has a hydrophobic (water-repelling) tail and a hydrophilic (water-loving) head, as shown in Figure 2. This property allows them to react with both water and oil, which normally doesn't mix with water.
The surfactants in shampoo account for its cleaning power. When washing your hair, the part of the surfactant that is compatible with oil (hydrophobic tail) sticks to the greasy and oily materials in your hair, whereas the water-soluble part, the hydrophilic head, aligns with the water. If many surfactant molecules do this, they form a micelle structure, which traps the grease and oil in its middle, as shown in Figure 3. This way, the oil that is trapped in water with surfactants can easily be washed away, while water without surfactants fails to remove the grease from your hair.
Although its cleaning power is probably the most important criteria for a good shampoo, there are many other aspects that decide the quality of a shampoo. In fact, a shampoo needs to meet many requirements to be accepted by customers like yourself. This is why, besides surfactants, there are also so-called additives in each shampoo that optimize its look, feel, or performance, such as additional foam builders, thickeners, conditioning agents, or preservatives. For example, the ability to create lots of foam is important because people associate more foam with more cleaning power. Although this is not necessarily true, a shampoo sells much better if it makes more foam. Therefore, additional (synthetic) surfactants are used as foam builders that have a strong capability to produce foam. Just think about what you love about your favorite shampoo! You probably would not like it if it would not meet all the criteria below (and probably some more):
- It removes the dirt and grease from your hair
- It makes a good amount of foam so it feels nice and you can spread it easily through your hair
- It does not stick to your hair and can easily be rinsed
- It makes your hair shiny and soft
- It smells nice
- It does not irritate your scalp or your hands
This is why the cosmetics industry and world of beauty products needs scientists! Scientists constantly research new shampoo formulations and developed specific quantitative tests to evaluate each of these properties for every new product they create. The combination of these specific tests allows them to compare different shampoo recipes based on quantitative data to find the one formula that performs best overall. For example, they can find out which ingredients help to remove grease most efficiently or make the best foam.
In this science project, you will create your own shampoos using two different recipes based on organic ingredients. Many people prefer "organic" or natural beauty products as they want to avoid synthetic (or man-made) chemicals that might damage their skin or could potentially be harmful. The most common organic replacement of synthetic surfactants are soaps based on olive or coconut oil. Castile soap, a surfactant made from olive oil, is one example that you will use in this project. Other natural shampoo formulations try to avoid surfactants entirely as they can throw off the pH balance of your scalp and might irritate your hair and skin. You will also prepare one of these shampoo recipes without surfactants which is based just on coconut milk. Do you think these organic shampoos are as good as a store-bought product? Start the shampoo testing and find out!
Terms and Concepts
- Shampoo
- Sebum
- Formulation
- Surfactant
- Hydrophobic
- Hydrophilic
- Micelle
- Additive
- Synthetic
- pH
Questions
- Why do people use shampoo?
- What ingredients are in shampoo? Can you find out the purpose of each of them?
- Which properties are most important for a shampoo and how would you test these? Which tests do commercial companies use?
- What are the reasons why some people use their own organic shampoo formula? Do you think these products can perform as well as synthetic shampoo formula?
Bibliography
- How Products are Made. (n.d.). Shampoo. Madehow.com. Retrieved March 10, 2017.
- Schwarcz, J. (1998). Secrets of Shampoo. Special to The Washington Post. Retrieved March 10, 2017.
- Casse, L. (2016). Types of surfactants in your shampoo. hairmomentum.com. Retrieved March 10, 2017.
- Manimaran V. (n.d.) Formulation & Evalutation of Shampoo. Lecture (Unit V), Department of Pharmaceutics, SRM College of Pharmacy. Retrieved March 10, 2017.
- Kumar A., Mali R. R.. (2010). Evaluation of Prepared Shampoo Formulations and to Compare Formulated Shampoo With Marketed Shampoos. International Journal of Pharmaceutical Sciences Review and Research Volume 3, Issue 1, p 120–126. Retrieved March 10 2017.
Materials and Equipment
You will need these items to make your own organic shampoo:
- Containers or bottles for shampoo, 16 oz (2)
- Measuring cup
- Tablespoons (at least one)
- Teaspoons (at least one)
- Bowls (2)
- Full fat coconut milk (14 fl oz can)
- Honey (2 tablespoons)
- Jojoba oil (2 teaspoons)
- Olive oil
- Apple cider vinegar (2 tablespoons)
- Essential oil (for example, lavender or lemon) (1 teaspoon)
- Cup, 4–5 oz
- Fresh herbs (such as thyme, lavender, rosemary, chamomile) or a herbal teabag
- Tap water
- Oven or microwave to heat up water
- Castile soap (2 oz)
For your shampoo evaluation and testing you will need to gather these items:
- Shampoo of your choice (store-bought)
- Mason jars with lid, 8 oz (one for each shampoo you test)
- Mason jar with lid, 16 oz (1)
- Wool yarn, should be natural color and 100% wool; available from Amazon.com
- Scissors
- Digital scale with 0.1 g increments; a digital scale that would be suitable is the Fast Weigh MS-500-BLK Digital Pocket Scale, available from Amazon.com
- Coconut oil
- Acetone (about 900 mL); available at your local hardware store.
- Safety goggles
- Latex or nitrile gloves
- Stopwatch or timer
- Hairdryer
- Aluminum foil
- Heat-resistant bowl
- Kitchen thermometer
- Paper towels
- Heat-resistant plates (3)
- Oven
- pH test strips; available from Amazon.com
- 250 mL measuring cylinder; available from Amazon.com
- Test tubes; available from Amazon.com. Alternatively, 2 oz mini cups with lids can be used.
- Indian ink; available from Amazon.com
- Medicine dropper or pipette
- Permanent marker
- Lab notebook
Disclaimer: Science Buddies participates in affiliate programs with Home Science Tools, Amazon.com, Carolina Biological, and Jameco Electronics. Proceeds from the affiliate programs help support Science Buddies, a 501(c)(3) public charity, and keep our resources free for everyone. Our top priority is student learning. If you have any comments (positive or negative) related to purchases you've made for science projects from recommendations on our site, please let us know. Write to us at scibuddy@sciencebuddies.org.
Experimental Procedure
Making the Shampoos
You will start by preparing two different shampoo formulations as shown in Table 1.
Show step-by-step instructions
- Start with the coconut milk shampoo recipe and gather all the necessary ingredients.
- In one of your bowls, mix all the ingredients listed in Table 1 under Recipe 1 together and stir with a spoon until smooth. Note: The coconut milk might have separated in the can, so you have to stir it well. You can also use a whisk to smooth the shampoo mixture.
- Once everything is mixed, fill a prepared and labeled jar or bottle with the shampoo for testing.
- Get the ingredients for the castile soap herbal shampoo recipe ready.
- Prepare the herbal infusion for your shampoo.
- Pour 4–5 oz of tap water into a kettle or cup and heat it up on the stove or in the microwave.
- Place your fresh herbs or the herbal teabag in a cup and pour the simmering hot water over the herbs.
- Cap the cup and let sit for about 15–30 minutes.
- Then, remove the teabag or strain the infusion to remove all the herbs.
- Pour the freshly-made herbal infusion into a clean bowl and add the other ingredients shown in Table 1 under Recipe 2 to the water.
- Gently stir until everything is mixed.
- Then fill a second labeled jar or container with the herbal shampoo for your test.
- You now should have two self-made organic shampoo formulations plus the store-bought shampoo ready for the next step, which is the shampoo evaluation.
- Note: You can store both shampoo recipes in your fridge for up to seven days if you don't have time to proceed with the shampoo testing right away.
- Based on your shampoo ingredients and the information from the Introduction, how do you think the different shampoos will perform in each test?


Click through the slideshow for step-by-step instructions for making the shampoo.
Testing the Cleaning Power
The most important criteria of a shampoo is how efficiently it removes dirt and grease from your hair. In this test, you will measure how much grease is removed from dirty wool (which simulates hair) in one washing cycle.
Before you start, copy Table 2 in your lab notebook. It will help you record the data.
Show step-by-step instructions
- Take the 100% wool yarn and prepare three wool balls that weigh exactly 5 grams each. Use the digital scale to measure each one and write down its mass into your data table. They should all start out with the same mass.
- Soil the wool balls with artificial sebum or hair grease.
- Prepare a 10% solution of artificial sebum or hair grease.
- Add 15 grams of coconut oil and 15 grams of olive oil to a 16 oz jar.
- Stir the oil mixture with a spoon until it is smooth.
- Put on your safety goggles and gloves and carefully pour 270 mL of acetone into the clean, dry measuring cylinder. Important: When working with the acetone, make sure there are no open flames close by and that you work in a well-ventilated area.
- Add the acetone to the oil mixture in the jar. Close the lid and shake it until everything is dissolved. The solution should now be yellow.
- Put the prepared wool yarn balls into the jar with the dissolved oil mixture, close the lid and set the timer for 20 minutes.
- Shake the jar with the wool up and down for 2 minutes every 5 minutes until the 20 minutes are over.
- Then, go outside and while still wearing gloves, carefully remove the wool pieces from the jar. Wring them and place all pieces on a piece of aluminum foil. Entangle the wool a little bit so it can dry better. Let the wool sit outside (or close to an open window) for about 1 hour so the acetone can evaporate. Note: While waiting, you can start with the other shampoo tests described below.
- After one hour, bring the aluminum foil with the wool pieces inside. Put one wool ball into a heat-resistant bowl and blow-dry it with your hairdryer on low for one minute. Repeat with the other two wool pieces. Do the wool pieces feel very greasy?
- Prepare a 10% solution of artificial sebum or hair grease.
- Use the digital scale to measure how much grease was taken up by the wool.
- Weigh the three pieces of wool one at a time and write down the result in the data table.
- Note: At this point, the masses of all wool pieces might not be the same anymore. In that case, when continuing with the procedure, you have to keep track of which one is which. You could, for example, mark each wool piece with a different number of knots at the end of the yarn.
- Preheat your oven to 76°C or 170°F.
- Prepare a 5% wash solution of each shampoo in a separate labeled 8 oz Mason jar. The temperature of the water that you use for this step should be around 37°C or 99°F.
- Add 10 grams of the first shampoo recipe to a labeled 8 oz jar and fill it with 37°C or 99°F tap water until the scale reads 200 grams. Note: Shake the shampoo slightly before use to make sure it is well-mixed, and make sure that the water is about the same temperature for each shampoo and trial.
- Use a teaspoon to mix the solution.
- Wash, rinse and dry the soiled wool balls.
- Add one wool piece to each of the prepared shampoo solutions. Make sure you know the mass of the piece that you added to each shampoo.
- Close the lid of the jars and shake them up and down for 4 minutes.
- Open the jars in the sink and rinse each of the wool pieces separately.
- For each rinse, fill the cleaned measuring cylinder with 200 mL of warm water. The water should have the same temperature as the water you used for washing the wool.
- Slowly pour the water over your washed wool piece. Squeeze out all the foam from the wool during rinsing (do not pour the water over your wool too quickly). Make sure you use the same rinsing technique every time.
- After rinsing, place the wool pieces on a paper towel. Make sure to keep track of which piece was washed with which shampoo. You can, for example, use the method of making a different number of knots in each wool piece or make labels on the paper towel.
- To dry the wool, put each wool ball into a heat-resistant bowl one at a time, and blow-dry it with your hairdryer on low for five minutes.
- After blow-drying, place each wool piece on a labeled heat-resistant plate and put them in the preheated oven (170°F) for 30 minutes.
- Then, take the plates out of the oven (be careful not to burn yourself), and let the plates cool down.
- Finally, once all the wool pieces are dry, weigh each piece on the scale after you put it to zero and record their masses in your data table.
- Feel the wool pieces with your hands and make a note of if it still feels greasy or not. Write your observations in your lab notebook.
- This completes one trial. Repeat steps 1–8 two more times for a total of three trials for each recipe. Note: You can also do all the trials in parallel instead of sequentially to save time. Another option is to start with soiling all the wool pieces at the same time and then continue washing and rinsing separately for each trial. The soiled wool balls can be stored for a couple of days. Just make sure to weigh them again before you use them.


Click through the slideshow for step-by-step instructions for testing the shampoo cleaning.
Testing the Skin and Hair Compatibility
In this test, you will test how acidic or basic your shampoo is, which you can find out by measuring its pH. A pH > 7 means a solution is basic, whereas a pH < 7 means that a solution is acidic. A solution is neutral if its pH is equal to 7. Your skin and hair have a pH that is in the neutral range or slightly acidic (5.5–6). Their pH balance can easily be affected by products that are very acidic or basic. Therefore, this pH test will evaluate if the shampoo is skin- and hair-friendly, or if it has the potential to irritate your scalp and damage your hair.
Before you start, copy Table 3 in your lab notebook. It will help you record the data.
Show step-by-step instructions
- Prepare a 10% solution of the first shampoo.
- Add 10 grams of the first shampoo recipe to a labeled 8 oz jar and fill it tap water until the scale reads 100 grams. Note: Shake the shampoo slightly before use to make sure it is well-mixed.
- Use a teaspoon to mix the solution.
- Repeat step 1 with the other two shampoos.
- Use a pH test strip and dip it into one of the solutions. It will change color depending on how acidic or basic your shampoo is.
- Compare the color of your test strip with the color palette on the package of your pH test trips. Match the color to a pH value and write the result in your data table.
- Repeat step 3 and 4 for the other two shampoo solutions.
- Rinse out all the jars properly and dry them.


Click through the slideshow for step-by-step instructions for testing compatibility.
Testing the Foaming Behavior
Most people associate a great volume of foam with a "better" shampoo product (although scientific tests have shown that foam does not have a great influence on a shampoo's cleaning power). Therefore, the foaming behavior is an important characteristic for customer acceptance. In this test, you will evaluate the shampoo's foam volume and stability.
Before you start, copy Table 4 in your lab notebook. It will help you record the data.
Show step-by-step instructions
- Prepare a 10% shampoo solution for your first shampoo
- Add 20 grams of the first shampoo recipe to a labeled 8 oz jar and fill it tap water until the scale reads 200 grams. Note: Shake the shampoo slightly before use to make sure it is well mixed.
- Use a teaspoon to mix the solution.
- Get your 250 mL measuring cylinder and carefully pour 50 mL of the 10% shampoo solution inside. You do not want to create any foam yet!
- Have a timer ready and set it to four minutes.
- Take the measuring cylinder between your hands so that your palm covers and seals off the top and shake it very hard for ten times up and down. Note: Do your best to keep the shaking speed constant for all shampoos and trials.
- Immediately after you are done shaking start your timer and read the volume of the generated foam inside the measuring cylinder. Important: You have to read the mL level at which the foam phase starts (at the bottom, right above the liquid) and where it ends at the top. Write down the results in your data table.
- To assess the foam stability, keep reading the foam volumes every minute for four minutes in total. Note: The foam level is likely to change most at the interface between the liquid and the foam, not at the top of the foam layer.
- Once you have monitored the foam volume over four minutes, clean out the measuring cylinder (make sure all the shampoo and foam is removed) and repeat steps 1–6 with the other two shampoos.
- This completes one trial. Repeat steps 1–7 two more times for a total of three trials for each shampoo.


Click through the slideshow for step-by-step instructions for testing the foaming of the shampoo.
Testing the Dirt Dispersion
A good shampoo should make it easy to rinse dirt from your hair off. However, if the dirt gets trapped in the foam of the shampoo, it is likely to redeposit on your hair and will stay there. In this test, you will assess if the shampoo concentrates dirt in the foam or water phase (which makes it easier to rinse it off). In contrast to the previous tests, which were quantitative tests, this will be a qualitative test in which you will only observe but not measure the quality of each shampoo.
Before you start, copy Table 5 in your lab notebook. It will help you record the data.
Show step-by-step instructions
- Get test tubes (or mini cups with lids), Indian ink, a dropper, and some water ready for the test.
- Label three test tubes (or mini cups with lids) for each shampoo recipe.
- Weigh off about 0.3 grams of shampoo in the corresponding empty cup or test tube and add 10 mL of water.
- With a pipette or medial dropper, add one drop of Indian ink to the shampoo solution.
- Close the lid and shake the test tube or cup for ten times up and down.
- Immediately after you finished shaking, look at the foam that formed during shaking. Estimate the amount of ink in the foam as "None," "Light," "Moderate," or "Heavy" and write your results into your data table.
- Repeat steps 3–6 with the other two shampoo recipes. Do your best to keep the shaking speed constant for all shampoos.
- This completes one trial. Repeat steps 3–7 two more times for a total of three trials for each recipe. Note: You can reuse the same test tubes or cups. Make sure you rinse them out and dry them in between each trial.


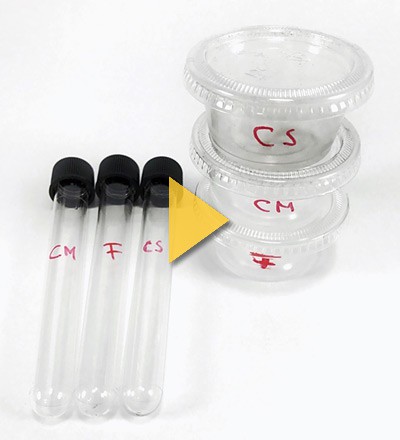
Click through the slideshow for step-by-step instructions for testing the dirt dispersion of the shampoo.
Analyzing Your Results
You have collected a lot of data! Now it is time to bring it all together and assess each test separately, as well as all tests combined.
- Assessing cleaning power from your results in data table 2.
- Start with calculating how much grease, or artificial sebum, (in grams), was taken up by each of the wool pieces. To do this, subtract the starting mass of the wool from the wool mass soaked with grease (after the acetone evaporation). Write down your results in your data table.
- Next, calculate how much grease was removed during the washing cycle for each trial. Subtract the final mass of the wool piece after washing and drying from the wool mass of the wool soaked with grease. Record the results in your data table. Note: If your result is negative, that means that instead of removing grease, the wool gained mass during the washing. If this happened, do you think this could be extra grease? Did the wool piece still feel very greasy after washing? Where could the extra grease have come from?
- Calculate the average wool masses from each step from all your three trials. Write down the averages in your data table.
- Finally, you can calculate the cleaning power of your shampoo as percentage. To do this, divide the amount of grease removed by the amount of grease taken up by the wool and then multiply by 100. Note: Again, if your percentage is negative, that means that your wool mass increased instead of decreased. If this was the case, think about what this extra mass could be and where it could have come from (see questions in step b.).
- Make a bar graph with the shampoo name on the horizontal x-axis and the cleaning power in percentage on the vertical y-axis.
- Looking at your cleaning power results, which shampoo is most efficient in removing grease from your hair? Was there a shampoo that had very low to no cleaning power? Can you think of reasons why a wool piece could gain mass during washing? Can you explain the differences in cleaning power looking at the ingredient list of each shampoo? Look back to the Introduction to find out which shampoo ingredients are most important for removing grease. Do you find this type of ingredient in all the shampoo recipes?
- Assessing skin-and-hair-compatibility from your results in data table 3.
- Make a bar graph that shows the shampoo name or recipe on the x-axis and the average pH value on the y-axis.
- Do all the shampoos have the same pH value? If not, which ingredients do you think make a difference? Do you think your shampoos are skin- and hair-friendly? Why or why not?
- Assessing foam volume and stability from your results in data table 4.
- Calculate the foam volume for each shampoo and trial by subtracting the mL readings of the bottom from the top readings for each time point. Record the calculated volumes in your data table.
- Determine the average foam volumes.
- Make a bar graph that shows the initial foam volume after shaking (at 0 minutes) for each shampoo, with the shampoo name on the x-axis and average foam volume on the y-axis.
- Then, make another graph that shows foam stability and how the foam volume changes over time. This time, use a line graph and plot the time point (0, 1, 2, 3, 4 minutes) on the x-axis and the average foam volume for each time point on the y-axis. You can make an individual graph for each shampoo recipe or show all shampoos in one graph using different colors for each line.
- Which shampoo made the most foam? How stable was the foam? Was there a shampoo that did not make any foam? Can you correlate the foaming behavior with a specific shampoo ingredient, when looking at the differences in the shampoo recipes?
- Assessing dirt dispersion from your results in data table 5.
- You can use your data table directly to show your results on the display board.
- Did all shampoos perform the same? Which shampoo do you think will remove dirt best from your hair?
- Can you draw a final conclusion from your study about which shampoo performs best? What did you learn from each test about the shampoos? Do you think you need more tests to confirm your results? What do your combined results mean for your shampoo recipes? What ingredients did you find to be most important in your shampoos?
![]()
Ask an Expert
Do you have specific questions about your science project? Our team of volunteer scientists can help. Our Experts won't do the work for you, but they will make suggestions, offer guidance, and help you troubleshoot.
Variations
- Are you curious about how other shampoos perform? What about specialty shampoos such as baby products or dandruff shampoos? Do they have different qualities? Find out by repeating the tests in this experiment with these products and compare the results to regular shampoo. You can always include more shampoos in your testing, including other self-made recipes that you want to try!
- The cleaning power of shampoos is very important. Do you think you can improve a shampoo's cleaning power by changing the temperature of the washing water or using more or less shampoo for each wash? Experiment with a range of shampoo concentrations or water temperatures and find out!
- What other qualities of a shampoo are important for customers and could be tested? Do some research and find out about other shampoo evaluation tests. Here are some ideas that you can look up: wetting behavior, percent solids, viscosity, conditioning, detergency—or create your own tests!
- Whereas all the tests in this experiment measure a specific quality or property of each shampoo, the results will still not tell you if people actually like the shampoo or not. Design an experiment in which you can test how customers rate each shampoo's performance. For your survey, you could, for example, use real hair swatches that you wash with each shampoo and let volunteers decide which one looks and feels best.
- If you are interested in more cosmetic science projects and putting other beauty products to the test, check out Science Buddies' project Cosmetic Science: Testing Lip Balm Recipes.
Careers
If you like this project, you might enjoy exploring these related careers:
Career Profile
Chemical engineers solve the problems that affect our everyday lives by applying the principles of chemistry. If you enjoy working in a chemistry laboratory and are interested in developing useful products for people, then a career as a chemical engineer might be in your future. Read more
Career Profile
What makes it possible to create high-technology objects like computers and sports gear? It's the materials inside those products. Materials scientists and engineers develop materials, like metals, ceramics, polymers, and composites, that other engineers need for their designs. Materials scientists and engineers think atomically (meaning they understand things at the nanoscale level), but they design microscopically (at the level of a microscope), and their materials are used macroscopically… Read more
Career Profile
Some of the biggest questions in science—like how to cure cancers or how to control global warming—require large teams of scientists to answer. Science managers work to coordinate and direct the research of these teams to ensure collaboration among the scientists and effective use of equipment and resources. Read more
Related Links
- Science Fair Project Guide
- Other Ideas Like This
- Chemistry Project Ideas
- Cosmetic Chemistry Project Ideas
- My Favorites
News Feed on This Topic

, ,
Cite This Page
General citation information is provided here. Be sure to check the formatting, including capitalization, for the method you are using and update your citation, as needed.
MLA Style
Lohner, Svenja. "Make Your Own Shampoo and Test How It Performs!" Science Buddies, 4 Nov. 2021, https://www.sciencebuddies.org/science-fair-projects/project-ideas/Chem_p109/chemistry/make-your-own-shampoo-and-test-how-it-performs. Accessed 19 June 2022.
APA Style
Lohner, S. (2021, November 4). Make Your Own Shampoo and Test How It Performs! Retrieved from https://www.sciencebuddies.org/science-fair-projects/project-ideas/Chem_p109/chemistry/make-your-own-shampoo-and-test-how-it-performs
Last edit date: 2021-11-04
Explore Our Science Videos
Ball Launcher: 2018 Fluor Engineering Challenge
Why Soda Fizzes – Boyle's Law Demonstration
Free science fair projects.
whiteflualinte1985.blogspot.com
Source: https://www.sciencebuddies.org/science-fair-projects/project-ideas/Chem_p109/chemistry/make-your-own-shampoo-and-test-how-it-performs
0 Response to "Funny Homework Is Slideshow Conditioner Before Shampoo"
Post a Comment